Dota 2 Timer – From Ideas to a Finished Project


Around two weeks ago I wrote a post about ideas for my Arduino project to be done for my prototyping course held by Tero Karvinen. I agreed to do this project with Péter Takács and we decided our project to be the Dota 2 Timer, considering the time and resources we had.
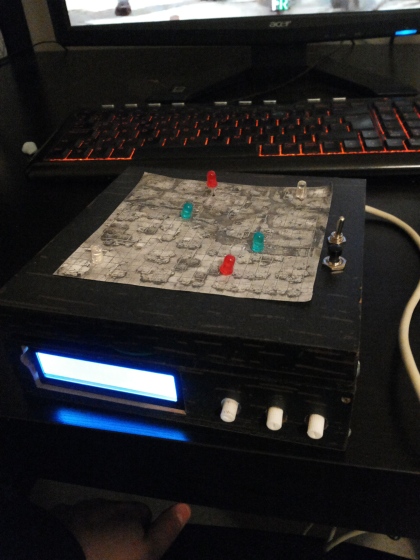
Finished Dota Timer
Finished Dota Timer

The final prototype in a nutshell

Understanding this prototype requires understanding some of the basics in the game itself. For new players its not so easy to keep tracks of things that might be happening around the map while playing a match. This timer is used to help the player understand more concretely some basic timing of the game. It could also be a nice addition to LAN parties  – if not payed attention to, it blinks leds every now and then anyway.

  • The timer is a box with 6 leds, an on/off switch and a pushbutton on top of it. On the side of the box there is a lcd screen and three potentiometers. There are also 2 holes in the back of the box for the usb and dc – cable.
  • The LCD shows the time in minutes:seconds since reset (flicking the on/off -switch) working as a timer to go on with the game.
  • At particular times the LCD prints out things that should be noted and flashing the leds on top of the box accordingly these prints are.
    • Rune (every 2 minutes) – blue leds are lit.
    • Creeps in the jungle (every minute and also at 0:30 mark) – red leds are lit.
    • Catapult (every 3 minutes 30 seconds). – white leds are lit.
    • Courier (at 3 minute mark) – no leds light up.
  • When the pushbutton on top of the box is pressed, the lcd takes the time at that moment, adds 8 minutes to it and prints it on the lower line. This helps player to keep track on how Roshan respawns.

Continue reading Dota 2 Timer – From Ideas to a Finished Project

Giving attention to your dearest Arduino – Reading and Writing on serial ports

Until this post I have been covering ways to sense the world around us by using arduino. But its also possible to make arduino listen to us sometimes. We all need that special attention you know! Arduino IDE itself provides a great way of reading the values different sensors put up on Arduino read. Its also to possible to give some sort of input inside Arduino itself. You can open Arduino IDE’s own serial monitor from the top right corner of the window.

There it is. I marked it out for you.

Continue reading Giving attention to your dearest Arduino – Reading and Writing on serial ports

It’s a head turner! Tower Pro Micro Serve 9g.

In this post I’m trying to make the arduino react to the world around it.  By attaching a servo motor to it, you can make arduino move the servo. Then you can attach anything to its “horns” (which we’re missing). You can make it move legs, hands, you name it, servo motor moves it.
There’s more that I’m uncovering through this post but I didn’t get to write about it all in one place, so I’ll be updating this post. See the info on the bottom to see possible dates of edits.
The Concrete setup of the servo on arduino board.

I started off basically by booting up Linux Xubuntu 12.04 from a live-cd. Updated the package lists and installed arduino IDE. After that I did a basic blink-program on the Arduino Duemilanove ATMEGA328 microcontroller to be sure the microocntroller was working. If you want to know more about setting up Hello world – blink on Arduino you can read my earlier post about it!

Continue reading It’s a head turner! Tower Pro Micro Serve 9g.

PING – HC-SR04 Ultrasonic sensor in arduino

The second component we received in our course was an ultrasonic sensor. It sends a ping and waits for it to come back. The ping is a signal that bounces back from the next direct surface facing the sensor. When the ping echoes back its possible to tell how long it took for the ping to echo back and we can calculate the distance based on it.

Continue reading PING – HC-SR04 Ultrasonic sensor in arduino

Using a button in Arduino and getting to know light dependent resistor

In this post I experimented with buttons and a light dependent resistor.
We got to know how buttons work so I’m going over how does it work at all by making a simple circuit with a button. The button circuit also demonstrates how the pullout resistor works.
Continue reading Using a button in Arduino and getting to know light dependent resistor

Hello arduino. Getting started with the microcontroller.

helloarduinoAs the new year started I got on to a new course which was focused on learning arduino microcontroller boards. In this post I’m running a Hello World program and trying to use the board to display a simple countdown timer through flashing leds.

Arduino is a single-board microcontroller, intended to make the application of interactive objects or environments more accessible. The hardware consists of an open-source hardware board designed around an 8-bit Atmel AVR microcontroller, or a 32-bit Atmel ARM. Pre-programmed into the on-board microcontroller chip is a boot loader that allows uploading programs into the microcontroller memory without needing a chip (device) programmer. -Wikipedia 21.1.2014

Continue reading Hello arduino. Getting started with the microcontroller.