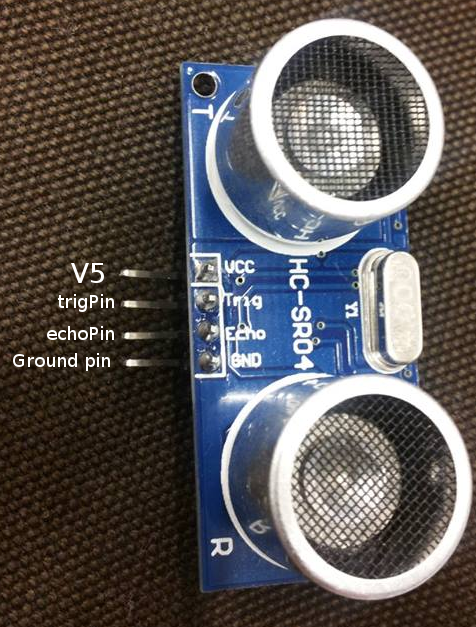
The second component we received in our course was an ultrasonic sensor. It sends a ping and waits for it to come back. The ping is a signal that bounces back from the next direct surface facing the sensor. When the ping echoes back its possible to tell how long it took for the ping to echo back and we can calculate the distance based on it.

Basic setup
We booted up th computer from live-cd, updated the package manager and tried out Hello World on arduino IDE to be sure that the microcontroller was working. We used a code found on this site http://arduinobasics.blogspot.fi/2012/11/arduinobasics-hc-sr04-ultrasonic-sensor.html to test out if the ultrasonic sensor was working. This was the setup on the microcontroller. From the microcontroller we connected the 5V pin to the sensors VVC’s pin and ground pin to the gnd pin. For trigPin and echoPin we used digital pins 7 and 8. We put up a LED on digital pin 13 and ground pin.
What do you need
- HC-SR04 Ultrasonic sensor
- 4 jumper wires
- 1 LED
/*
 This sketch originates from Virtualmix: http://goo.gl/kJ8Gl
 Has been modified by Winkle ink here: http://winkleink.blogspot.com.au/2012/05/arduino-hc-sr04-ultrasonic-distance.html
 And modified further by ScottC here: http://arduinobasics.blogspot.com.au/2012/11/arduinobasics-hc-sr04-ultrasonic-sensor.html
 on 10 Nov 2012.
 */

int echoPin 7 // Echo Pin
int trigPin 8 // Trigger Pin
int LEDPin 13 // Onboard LED

int maximumRange = 200; // Maximum range in cm
int minimumRange = 0;
long duration, distance;

void setup() {
 Serial.begin (9600);
 pinMode(trigPin, OUTPUT);
 pinMode(echoPin, INPUT);
 pinMode(LEDPin, OUTPUT);
}

void loop() {

 digitalWrite(trigPin, LOW);
 delayMicroseconds(2); // 1 microsecond = 0.000001 seconds

 digitalWrite(trigPin, HIGH);
 delayMicroseconds(10);

 digitalWrite(trigPin, LOW);
 duration = pulseIn(echoPin, HIGH);

 //distance (in cm) based on the speed of sound.
 distance = duration/58.2;    // t = r / c c=speed of sound (340m/s), t=time, r=distance

 if (distance >= maximumRange || distance <= minimumRange){   //if the distance is unreadable, turn the led off and print "out of range" to serial monitor

 to indicate "out of range" */
 Serial.println("Out of range! :(");
 digitalWrite(LEDPin, LOW);
 }
 else {

 Serial.print(distance);
 Serial.println(" cm");
 digitalWrite(LEDPin, HIGH);
 }

 //Delay 50ms before next reading.
 delay(50);
}
The LED lit up as the sensor could read a distance. If the distance could not be read, the LED was turned off and the serial monitor printed “out of range :(“. Testing out the ultrasonic sensor was a success.
Advanced prototyping. HC-SR04 combined with Piezo sensor
So what can you do with a distance sensor? We made it interactive by hooking up a piezoelectric sensor beside it. Whenever something is on a readable distance from the sensor, the piezoelectric sensor starts playing a tone. In other words the device starts beeping at a faster speed depending on the distance.
What do you need
- Arduino Duemilanove ATMEGA328 microcontroller
- 7 jumper wires
- HC-SR04 Ultrasonic sensor
- Piezoelectric sensor
- a x ohm resistor


int echoPin = 7;// Echo Pin
int trigPin = 8; // Trigger Pin
int LEDPin = 13;// Onboard LED

int maximumRange = 200; // Maximum range needed
int minimumRange = 0; // Minimum range needed
long duration, distance; // Duration used to calculate distance

void setup() {
 Serial.begin (9600);
 pinMode(trigPin, OUTPUT);
 pinMode(echoPin, INPUT);
 pinMode(LEDPin, OUTPUT); // Use LED indicator (if required)
}

void loop() {
/* The following trigPin/echoPin cycle is used to determine the
 distance of the nearest object by bouncing soundwaves off of it. */
 digitalWrite(trigPin, LOW);
 delayMicroseconds(2);

 digitalWrite(trigPin, HIGH);
 delayMicroseconds(10);

 digitalWrite(trigPin, LOW);
 duration = pulseIn(echoPin, HIGH);

 //Calculate the distance (in cm) based on the speed of sound.
 distance = duration/58.2;

 if (distance >= maximumRange || distance <= minimumRange){
 /* Send a negative number to computer and Turn LED ON
 to indicate "out of range" */
 Serial.println("-1");
 digitalWrite(LEDPin, HIGH);
 }
 else {
 /* Send the distance to the computer using Serial protocol, and
 turn LED OFF to indicate successful reading. */
 Serial.println(distance);
 digitalWrite(LEDPin, LOW);
  tone(13, 523, 300);
  delay(distance);                //Note: we're using a distance to measure the delay.
  noTone(13);
 }

 //Delay 50ms before next reading.
 delay(50);
}
Conclusion
HC-SR04 Ultrasonic sensor worked pretty well once we figured out how the different pins worked. Also using the examples that Arduino IDE itself provided us good information on what code to use.
Info
Tero Karvinen: Prototyypin rakentaminen
codes: arduino.cc
the tests were made with a computer on Haaga-Helia’s campus’ laboratory at Pasila.
Hewlett Packard 1494
4xIntel Core i5-2400 CPU @ 3.10GHz
Arduino board model: Duemilanove ATmega 328
In collaboration with Tanja Partanen and Peter Takacs
